Introduction
Automating email processing is crucial for many applications, from customer support to data integration. With Mockmail's webhook forwarding feature, you can automatically send incoming emails to a webhook URL for real-time processing. This eliminates the need for manual email handling and enables seamless integration with third-party services, such as CRMs, ticketing systems, and notification platforms.
Common Use Cases
- Automating support ticket creation in helpdesk software
- Storing customer inquiries in a CRM system
- Forwarding form submissions to a database or Google Sheets
- Triggering notifications in Slack or Microsoft Teams
- Running automated email assertions in CI/CD pipelines
- Processing inbound emails for custom workflows
What is a Webhook?
A webhook is a mechanism that allows applications to receive real-time HTTP POST requests whenever a specific event occurs. Unlike traditional polling, where a system repeatedly checks for updates, webhooks push data instantly when an event is triggered.
In the context of Mockmail, a webhook allows you to receive incoming emails as structured JSON payloads in real-time, enabling automated workflows and integrations.
Key Benefits:
- Real-time processing: No delays, no polling required
- Event-driven: Triggers only when emails arrive
- Structured data: Receive clean JSON instead of parsing raw SMTP
- Integration-ready: Works with any HTTP endpoint
How Mockmail's Webhook Forwarding Works
When an email is received by your Mockmail inbox, it can be automatically forwarded to a specified webhook URL. The forwarded email includes essential details such as sender address, recipients, email subject & body, and attachments, formatted as JSON.
Key Features:
- Instant email forwarding to any webhook endpoint
- JSON payload containing email details (headers, body, attachments)
- Support for structured email parsing and attachment handling
- Test webhook functionality before going live
Setting Up Webhook Forwarding in Mockmail
Step 1: Create an Inbox
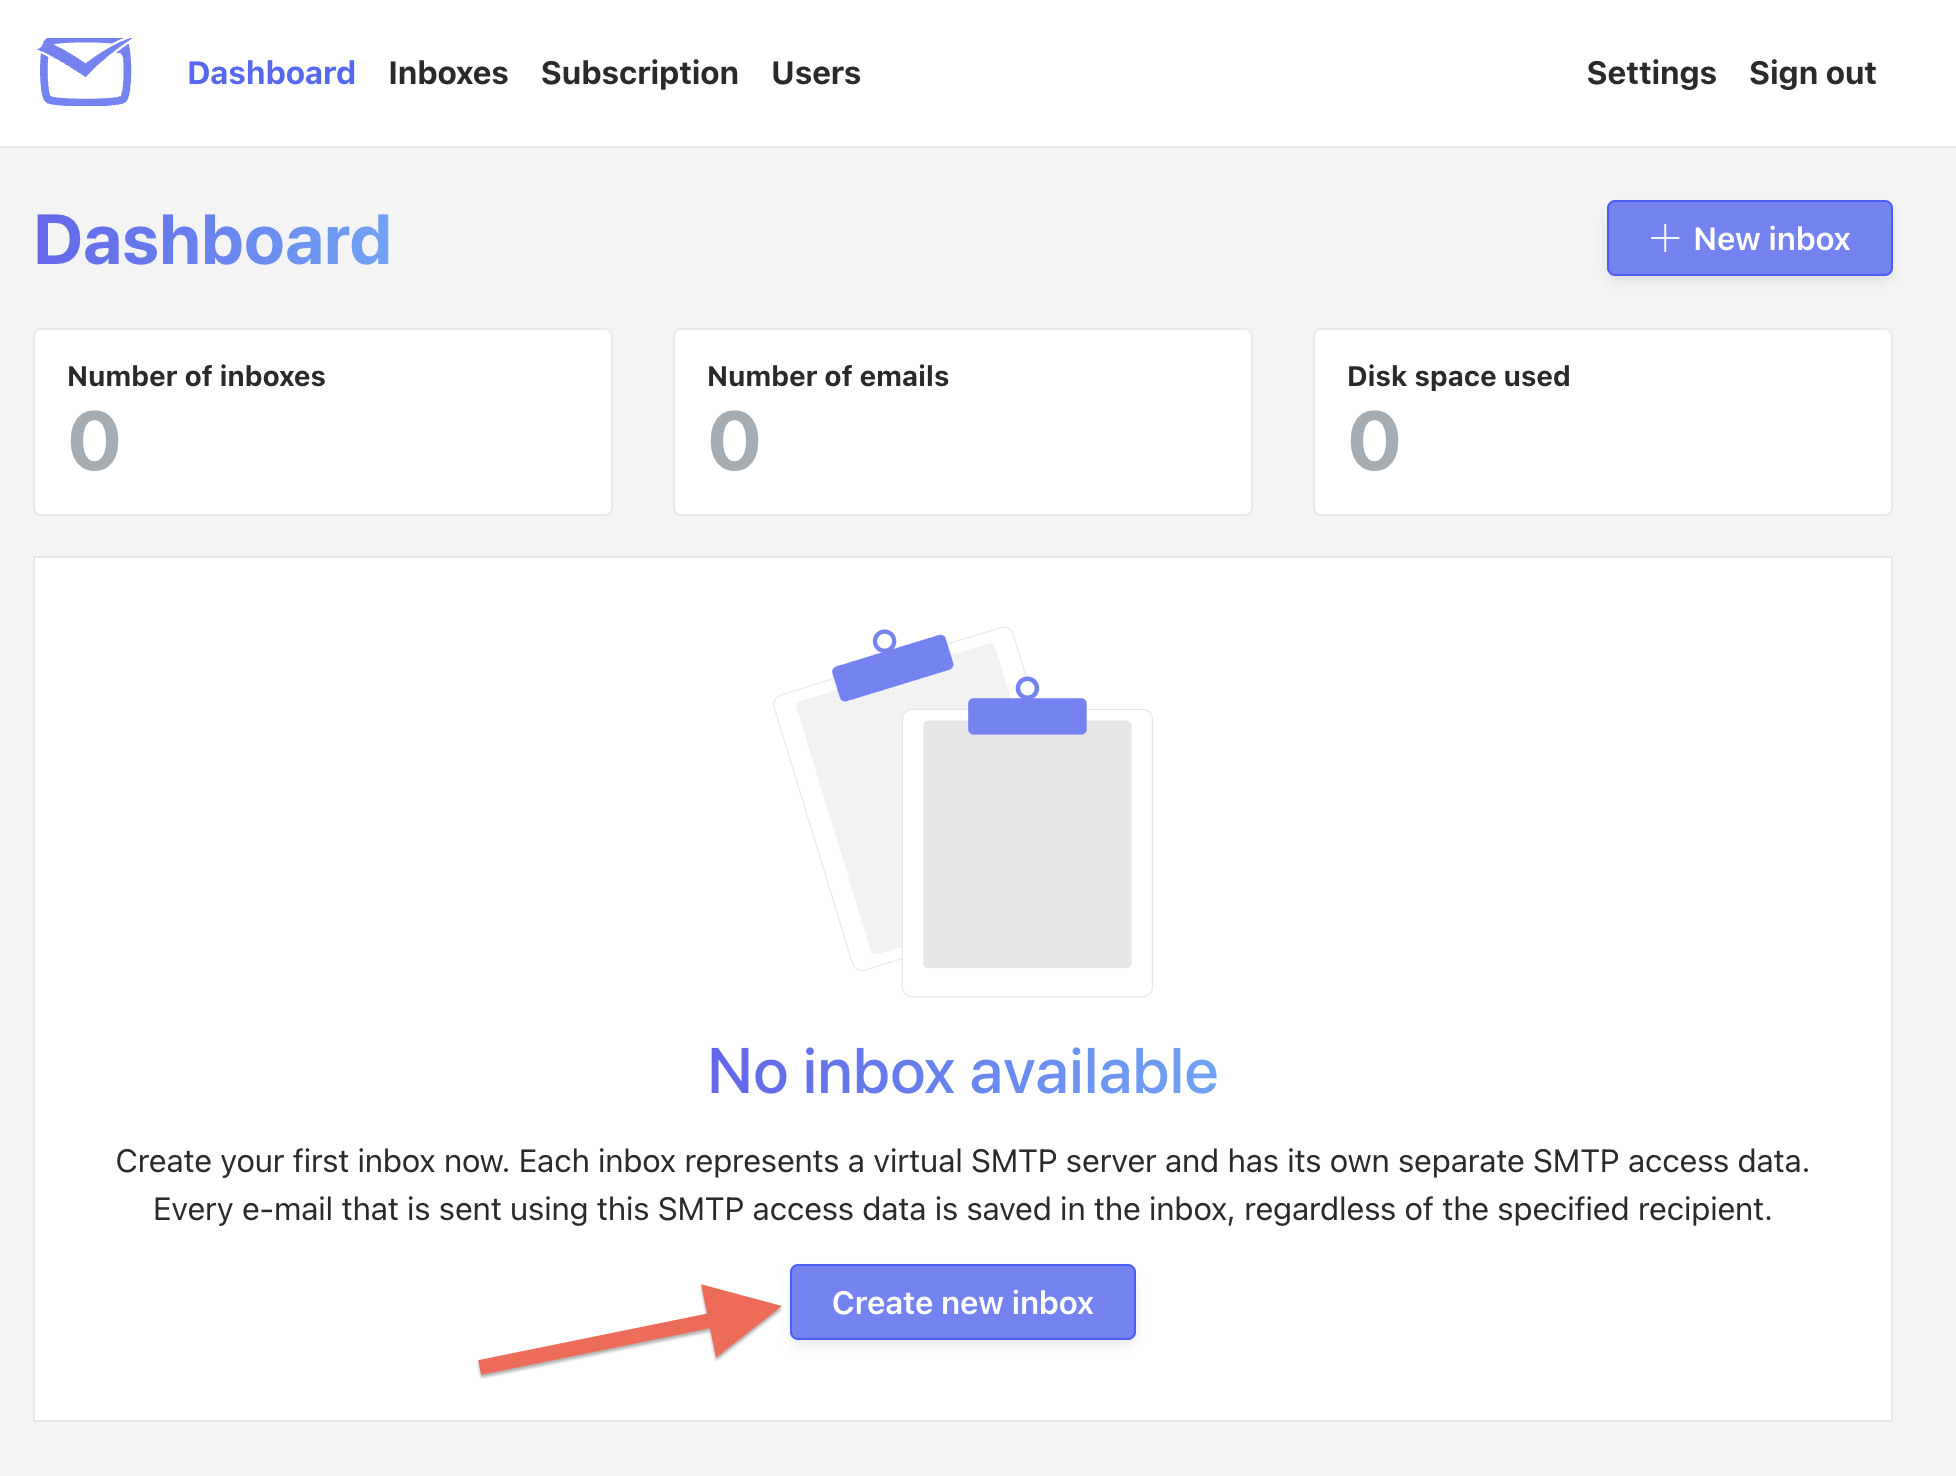
First, log in to your Mockmail account or create a new one. After signing in, click on "New Inbox" on your dashboard page.

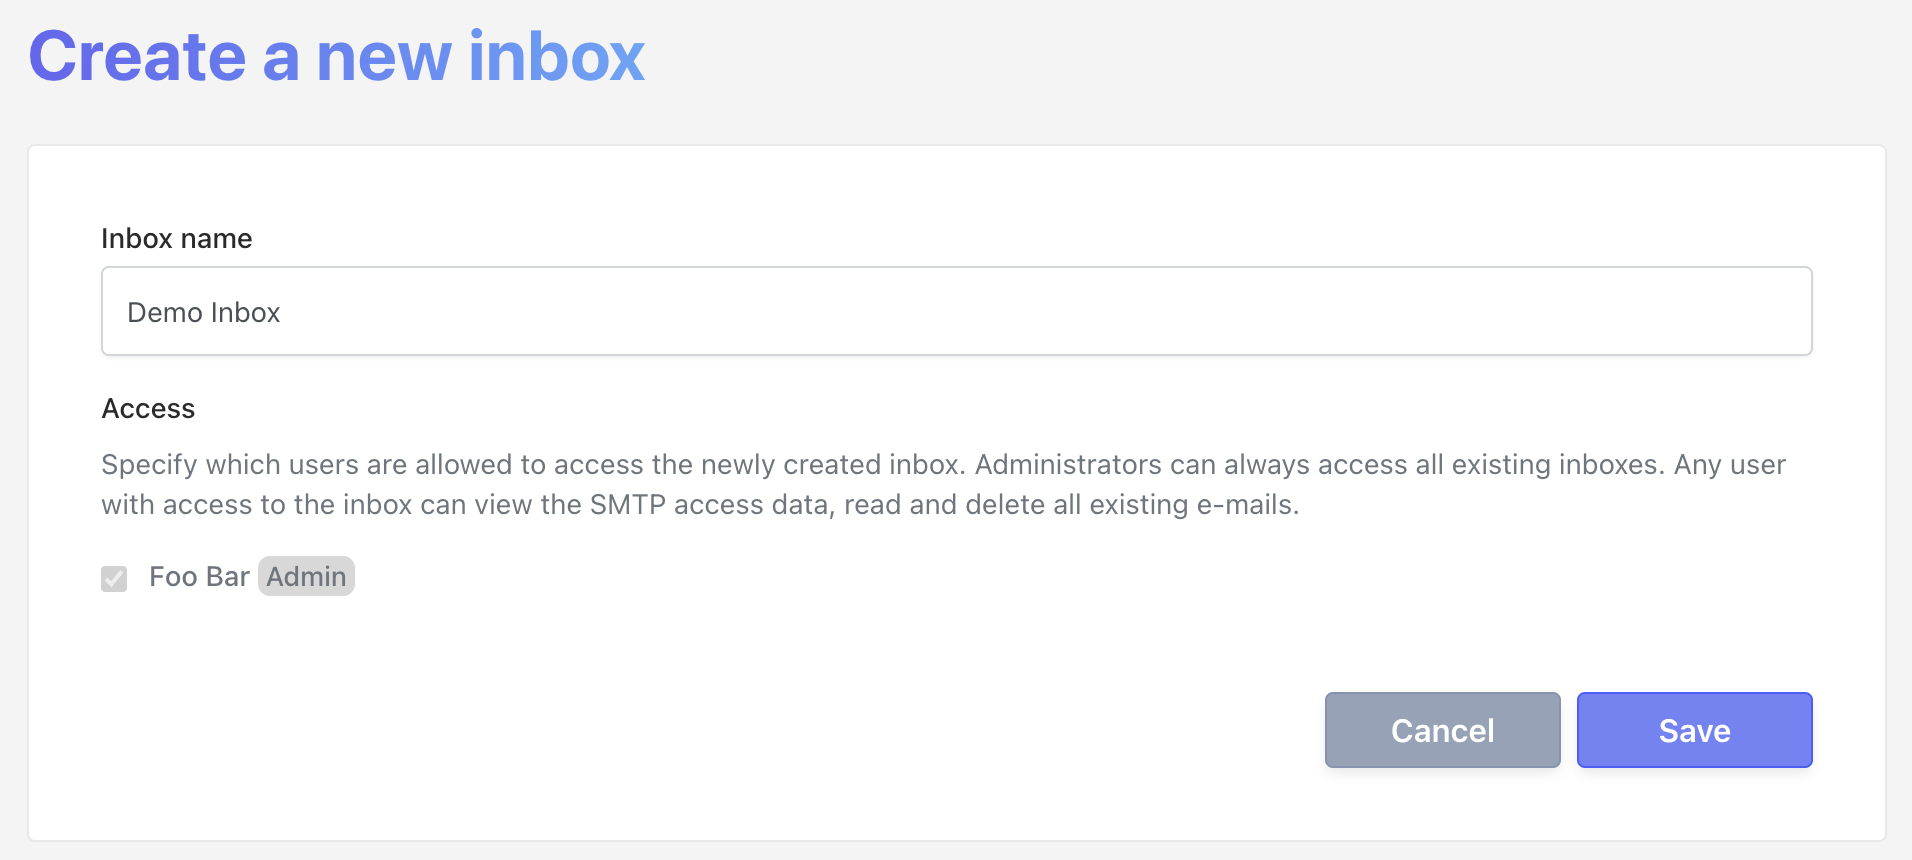
Enter a name for the new inbox and click on "Save".

Step 2: Configure the Webhook URL
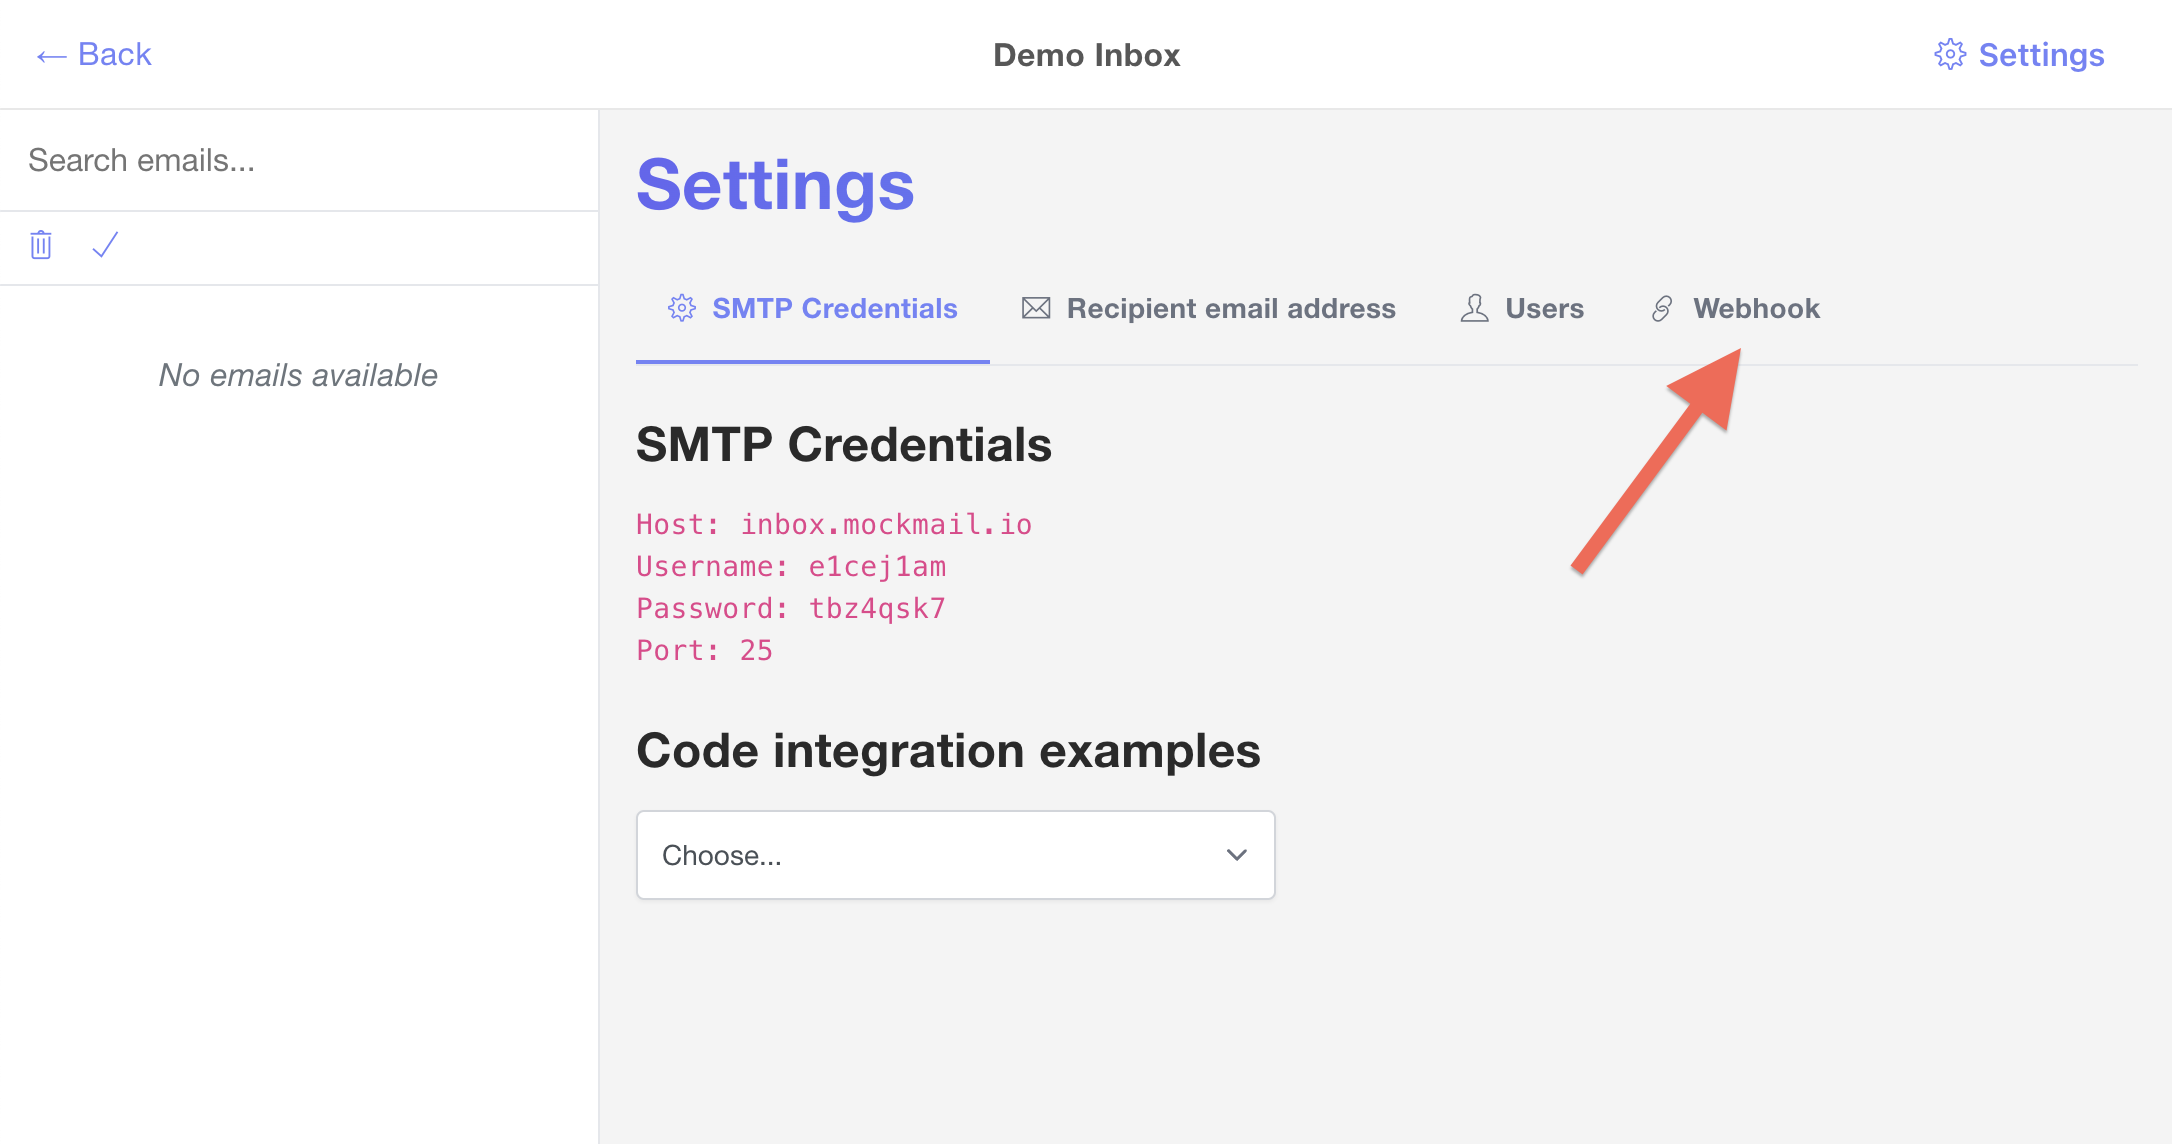
After inbox creation, you are automatically redirected to the newly created inbox. Click on "Webhooks" to access the webhook settings.

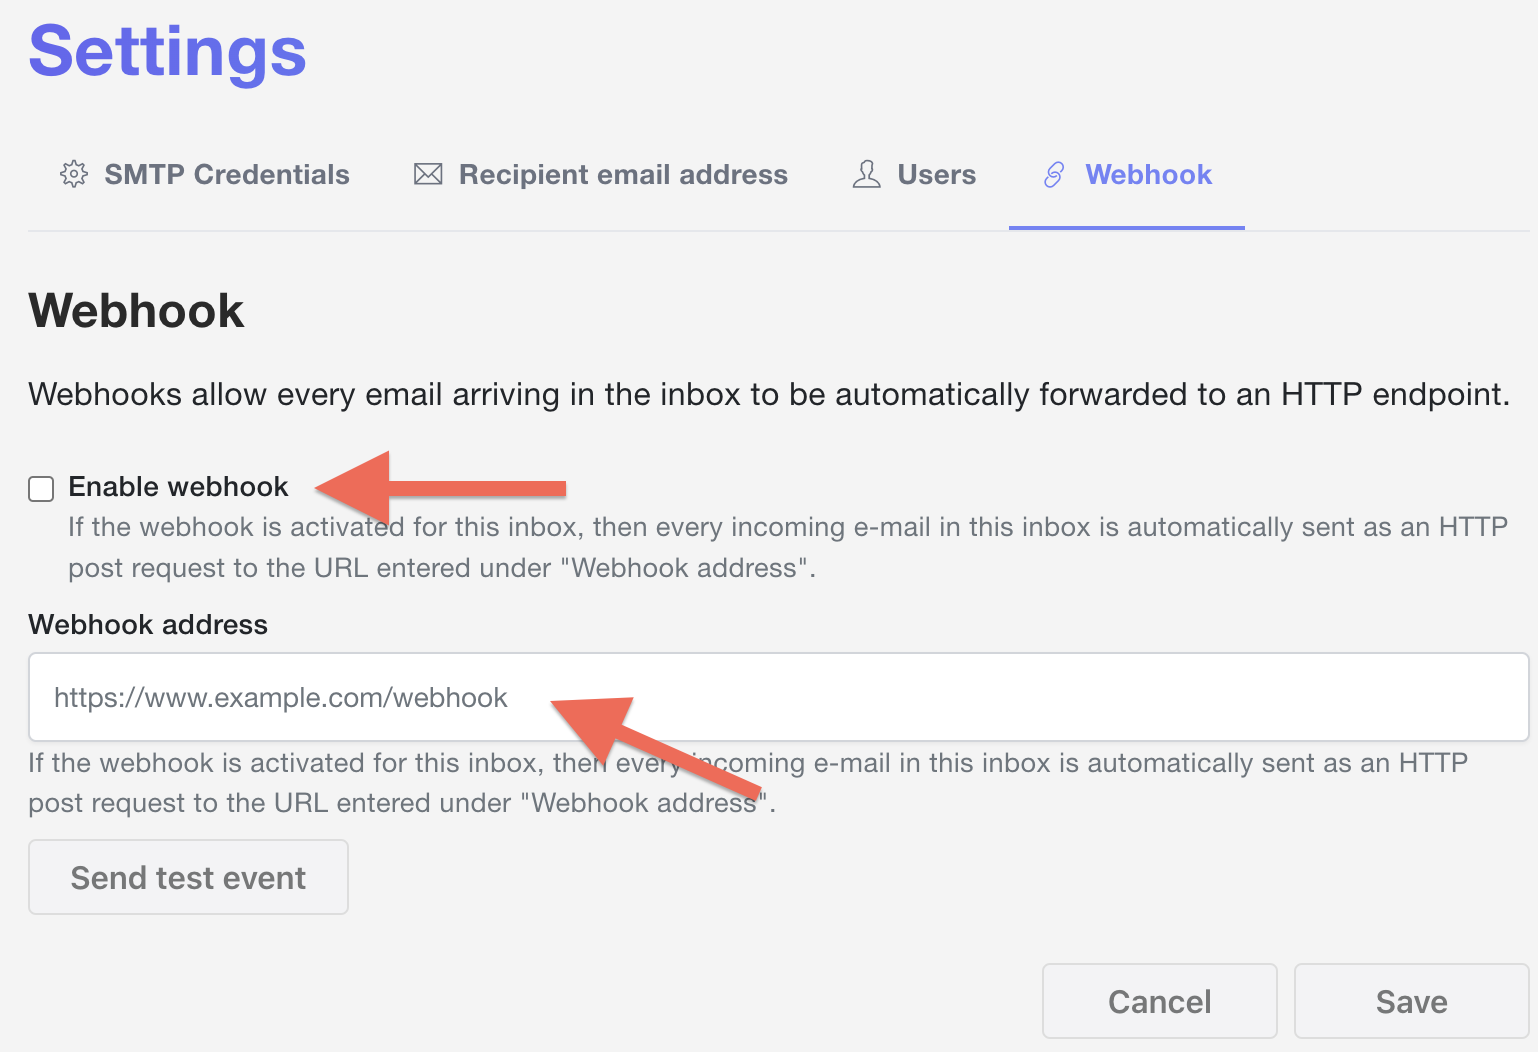
- Enable the webhook for the inbox by toggling the switch
- Enter the URL of your webhook endpoint
- Click on "Save"
To easily test your configuration, click on "Send test event". A demo request will be sent to the webhook URL you've previously defined.

Webhook Payload Structure
Once an email is received, Mockmail will send a POST request to your webhook URL with a JSON payload similar to the example below:
{
    "date": "2025-03-05T12:00:00Z",
    "subject": "Sample Webhook E-Mail",
    "from_address": "from@example.com",
    "from_name": "Mockmail Webhook",
    "to_address": "to@example.com",
    "content": {
        "html": "<p>Email body in HTML format</p>",
        "text": "Email body in plain text format"
    },
    "headers": {
        "message-id": "<unique-id@example.com>",
        "content-type": "text/plain; charset=UTF-8"
    },
    "attachments": []
}
Payload Fields:
date: ISO 8601 timestamp of when the email was receivedsubject: Email subject linefrom_address: Sender's email addressfrom_name: Sender's display nameto_address: Recipient's email addresscontent.html: HTML version of the email body (if available)content.text: Plain text version of the email bodyheaders: Email headers objectattachments: Array of attachment objects (Base64-encoded)
Handling Webhook Data in Your Application
Your webhook endpoint must be able to receive and process POST requests. Below are simple examples of how to set up a webhook receiver in different programming languages.
Node.js (Express.js) Example
const express = require('express');
const bodyParser = require('body-parser');
const app = express();
const PORT = 3000;

app.use(bodyParser.json());

app.post('/webhook', (req, res) => {
    const { date, from_address, from_name, to_address, subject, content } = req.body;

    console.log(`\n[New Email Received]`);
    console.log(`Date: ${date}`);
    console.log(`From: ${from_name} <${from_address}>`);
    console.log(`To: ${to_address}`);
    console.log(`Subject: ${subject}`);
    console.log(`Content: ${content.text.substring(0, 50)}...`);

    // Process the email data here
    // Save to database, trigger notification, etc.

    res.status(200).json({ message: 'Webhook received successfully' });
});

app.listen(PORT, () => {
    console.log(`Mockmail Webhook Server running on http://localhost:${PORT}`);
});
Python (Flask) Example
from flask import Flask, request

app = Flask(__name__)

@app.route('/webhook', methods=['POST'])
def webhook():
    data = request.json

    if data:
        print("\n[New Email Received]")
        print(f"Date: {data.get('date', 'N/A')}")
        print(f"From: {data.get('from_name', 'N/A')} <{data.get('from_address', 'N/A')}>")
        print(f"To: {data.get('to_address', 'N/A')}")
        print(f"Subject: {data.get('subject', 'N/A')}")
        print(f"Content: {data.get('content', {}).get('text', 'No content')[:50]}...")

        # Process the email data here
        # Save to database, trigger notification, etc.

    return '', 200

if __name__ == '__main__':
    app.run(port=3000, debug=True)
PHP Example
<?php
// webhook.php

// Read the JSON payload
$json = file_get_contents('php://input');
$data = json_decode($json, true);

if ($data) {
    error_log("\n[New Email Received]");
    error_log("Date: " . ($data['date'] ?? 'N/A'));
    error_log("From: " . ($data['from_name'] ?? 'N/A') . " <" . ($data['from_address'] ?? 'N/A') . ">");
    error_log("To: " . ($data['to_address'] ?? 'N/A'));
    error_log("Subject: " . ($data['subject'] ?? 'N/A'));
    error_log("Content: " . substr($data['content']['text'] ?? 'No content', 0, 50) . "...");

    // Process the email data here
    // Save to database, trigger notification, etc.
}

http_response_code(200);
echo json_encode(['message' => 'Webhook received successfully']);
Common Use Cases
CI/CD Email Testing
Use webhooks in your continuous integration pipeline to automatically verify email delivery:
- Configure a Mockmail inbox with a webhook pointing to your CI server
- Run your test suite that triggers email sending
- Your webhook endpoint receives the email and asserts its content
- Pass or fail the test based on the email data
Example assertion in Jest:
test('password reset email should be sent', async () => {
    // Trigger password reset
    await axios.post('/api/reset-password', { email: 'user@test.com' });

    // Wait for webhook to receive email
    await waitForWebhook();

    // Assert email content
    expect(lastReceivedEmail.subject).toBe('Password Reset Request');
    expect(lastReceivedEmail.to_address).toBe('user@test.com');
    expect(lastReceivedEmail.content.html).toContain('Reset your password');
});
Slack/Teams Notifications
Forward important emails to your team's communication platform:
app.post('/webhook', async (req, res) => {
    const email = req.body;

    // Send to Slack
    await axios.post(process.env.SLACK_WEBHOOK_URL, {
        text: `New Email: ${email.subject}`,
        blocks: [
            {
                type: 'section',
                text: {
                    type: 'mrkdwn',
                    text: `*From:* ${email.from_name} <${email.from_address}>\n*Subject:* ${email.subject}`
                }
            }
        ]
    });

    res.status(200).send('OK');
});
Database Storage
Automatically store all captured emails in your database for later analysis:
app.post('/webhook', async (req, res) => {
    const email = req.body;

    await db.emails.create({
        subject: email.subject,
        from: email.from_address,
        to: email.to_address,
        body_html: email.content.html,
        body_text: email.content.text,
        received_at: email.date
    });

    res.status(200).send('OK');
});
Troubleshooting
Webhook Not Receiving Data
Problem: Your webhook endpoint isn't receiving POST requests from Mockmail.
Solutions:
- Verify your webhook URL is publicly accessible (not localhost unless using tunneling)
- Check firewall settings and ensure your server accepts incoming connections
- Use the "Send test event" button in Mockmail to verify connectivity
- Check your server logs for incoming requests
- Ensure your endpoint responds with a 2xx status code
Invalid JSON Payload
Problem: Your application can't parse the webhook payload.
Solutions:
- Ensure your endpoint accepts
application/jsoncontent type - Use appropriate body parsing middleware (e.g.,
express.json()in Express) - Log the raw request body to inspect what's being received
- Verify character encoding (UTF-8)
Webhook Timeout
Problem: Mockmail reports webhook delivery failures.
Solutions:
- Respond quickly (within 10 seconds) with a 2xx status code
- Process heavy workloads asynchronously after acknowledging receipt
- Implement retry logic in your endpoint if processing fails
- Monitor endpoint performance and scale if needed
Testing Webhooks Locally
Problem: You want to test webhooks during local development.
Solutions:
- Use ngrok or localtunnel to expose your local server:
ngrok http 3000 - Use the provided public URL as your webhook endpoint in Mockmail
- Remember to update to your production URL when deploying
Best Practices
- Always respond with 2xx status codes immediately, even if processing fails
- Process emails asynchronously using job queues for heavy operations
- Validate webhook signatures (if Mockmail provides them) to ensure authenticity
- Implement idempotency to handle duplicate deliveries gracefully
- Log all webhook events for debugging and audit trails
- Use HTTPS endpoints in production for security
- Set up alerts for webhook delivery failures
- Test thoroughly using the "Send test event" feature before going live
Conclusion
Webhook email forwarding in Mockmail enables powerful automation workflows, from CI/CD email testing to real-time notifications and integrations. By following this guide, you can set up robust email processing pipelines that trigger automatically whenever emails are captured.
For more advanced use cases, explore combining webhooks with Mockmail's API for bidirectional email management and testing.